How To Install Decorative Garage Door Hardware – All American Doors

Installing decorative Garage Door Repair Miami FL is a great way to enhance the curb appeal of your home and give your garage door a stylish and custom look.

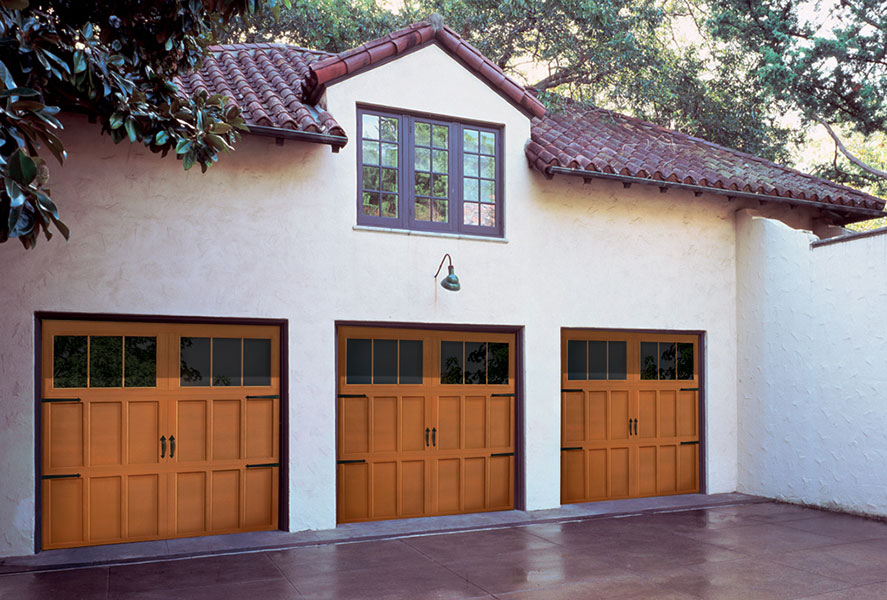
Decorative hardware, such as handles, hinges, and faux strap hinges, can add character and charm to your garage door. Follow these step-by-step instructions for a successful installation:

: Gather Tools and Materials

Before you begin, gather all the necessary tools and materials for the installation. You’ll need a power drill, screwdrivers, pliers, a level, a measuring tape, and the decorative garage door hardware kit, which typically includes screws and other necessary items.

: Choose the Right Hardware

Select the decorative hardware that complements the style of your garage door and your home. Consider the design, finish, and size of the hardware to ensure it enhances the overall aesthetics.

: Measure and Mark

Use a measuring tape to determine the desired placement of the decorative hardware on your garage door. Mark the locations for handles, hinges, and strap hinges using a pencil.

: Position the Hardware

Position the decorative hardware in the marked locations to ensure that it aligns with your design preferences. Use a level to make sure the hardware is straight and evenly spaced.

: Mark Screw Holes

Once the hardware is positioned correctly, use a pencil to mark the locations of the screw holes. This will guide you when drilling holes for the screws.

: Drill Pilot Holes

Using a power drill with the appropriate drill bit size, drill pilot holes at the marked locations. Make sure the pilot holes are slightly smaller than the screws to ensure a secure fit.

: Attach Handles

If your decorative hardware includes handles, align them with the drilled pilot holes and secure them using the provided screws. Use a screwdriver or power drill to tighten the screws.

: Attach Hinges

Align the hinges with the drilled pilot holes for their respective positions on the garage door. Secure them using the provided screws. Ensure that the hinges are straight and properly positioned.

: Attach Strap Hinges (If Applicable)

If your decorative hardware includes faux strap hinges, align them with the drilled pilot holes and secure them using the provided screws. Faux strap hinges are often used for decorative purposes and don’t have a functional role in the door’s operation.

: Check Alignment

After attaching the decorative hardware, step back and check the overall alignment and appearance. Ensure that all handles, hinges, and strap hinges are straight, evenly spaced, and aligned with each other.

: Repeat for Each Section

If your garage door has multiple sections, repeat the process for each section to ensure a consistent and balanced look. Pay attention to the spacing and alignment of the hardware across all sections.

: Final Inspection

Perform a final inspection of the installed decorative garage door hardware. Check for any loose screws, misalignment, or issues with the overall appearance. Make any necessary adjustments to ensure a polished and cohesive look.

: Maintenance (Optional)

Consider applying a protective coating or sealant to the decorative hardware to prevent corrosion and maintain its appearance over time. Follow the manufacturer’s recommendations for any specific maintenance requirements.

By following these detailed steps, you can successfully install decorative Garage Door Repair Miami FL and enhance the visual appeal of your garage door. Always refer to the specific instructions provided in the hardware kit and exercise caution when working with tools. If you encounter difficulties or have concerns, seek professional assistance for the installation.

All American Doors

8155 NW 93rd St, Medley, FL 33166, United States

1-305-885-8088

How To Install A Wireless Garage Door Keypad – Affordable Garage Door Repairs of Indianapolis, LLC

A wireless Indianapolis Garage Door Repair adds an extra layer of convenience and security to your home. No need to carry keys or remote controls; a keypad allows you to enter a secure code to open or close your garage door.

This article will guide you through the process of installing a wireless garage door keypad, ensuring a hassle-free experience.

Choosing the Right Wireless Keypad

Before beginning the installation, it’s crucial to select the right wireless garage door keypad for your needs. Consider factors such as compatibility with your garage door opener, the range of access codes, and additional features like backlighting for nighttime use.

Tools and Materials

To start the installation, gather the necessary tools and materials. Common items include a power drill, screwdriver, level, and the specific hardware provided with your wireless garage door keypad.

Safety Precautions

Safety should always be a top priority during the installation process. Wear safety glasses and gloves, and follow all safety guidelines provided in the keypad’s manual. If you’re unsure about any step, seek professional assistance.

Pre-Installation Checks

Before installing the wireless keypad, ensure that your garage door is in good condition. Check for any signs of wear or damage on the door and its components. Additionally, confirm that your garage door opener is compatible with a wireless keypad.

Installation Steps

  1. Choosing the Installation Location: Select a suitable location for the keypad, typically near the garage door entrance but out of direct weather exposure.
  2. Attaching the Keypad Base: Secure the keypad base to the chosen location using the provided screws. Ensure it is level and firmly attached.
  3. Connecting the Wires (if applicable): Some wireless keypads may require wiring for power. Follow the manufacturer’s instructions to connect the wires securely.
  4. Attaching the Keypad Cover: Place the keypad cover onto the base and secure it using the provided screws. Double-check for proper alignment.
  5. Programming the Keypad
    • Setting the Access Code: Follow the keypad’s manual to set your desired access code. Some keypads allow multiple codes for different users.
    • Syncing with the Garage Door Opener: Program the keypad to sync with your garage door opener system. This usually involves pressing a button on the opener and then entering a code on the keypad.

Testing and Troubleshooting

After programming, it’s crucial to test the wireless keypad. Enter the access code to ensure the garage door operates as expected. Address any issues promptly, and consult the troubleshooting section in the manual if necessary.

Regular Maintenance Guidelines

To maintain the optimal performance of your wireless garage door keypad, follow regular maintenance practices. Keep the keypad clean from dirt and debris, and replace the batteries periodically.

Comparison with Traditional Keypads

Wireless keypads offer several advantages over traditional wired models. They provide flexibility in installation locations, eliminate the need for complex wiring, and often come with additional features like backlighting for easy use at night.

Customer Reviews and Experiences

Gain insights from real users who have installed wireless garage door keypads. Reviews and testimonials can offer valuable information on the ease of installation, reliability, and overall satisfaction of other homeowners.

Customization Options and Accessories

Explore customization options and accessories for your wireless garage door keypad. Some keypads offer additional features like remote control integration, smartphone compatibility, or the ability to control multiple garage doors.

Security Features and Tips

Wireless keypads often come with security features such as temporary access codes and automatic lockout after multiple incorrect attempts. Additionally, consider periodically changing your access code for enhanced security.

Conclusion:

In conclusion, the installation of a wireless Indianapolis Garage Door Repair is a straightforward process that brings added convenience and security to your home. By following the steps outlined in this guide and prioritizing safety, you’ll enjoy the benefits of a well-installed keypad for easy and secure access to your garage.

Affordable Garage Door Repairs of Indianapolis, LLC

1-317-372-5337

How Much Is A New Garage Door And Opener Installed – A 24 Hour Door Service

Investing in a new Madison Garage Door Repair is a substantial decision that not only enhances the visual appeal of your home but also improves its functionality and security.

Understanding the various factors that contribute to the cost of a new garage door and opener, along with installation expenses, is crucial for homeowners embarking on this home improvement project. In this comprehensive guide, we will explore the elements that influence the overall expense, providing insights to assist homeowners in making informed choices.

The Dual Impact of a New Garage Door and Opener

A new garage door and opener duo not only refreshes the external appearance of your home but also elevates the convenience and safety of accessing your garage space. As you consider this investment, delving into the associated costs is essential.

Factors Influencing New Garage Door and Opener Costs

Material Selection

The material of the garage door and opener components significantly influences the overall cost. Common garage door materials include steel, wood, aluminum, and fiberglass. Opener components may include motors, drives, and smart technology features. Each material has unique characteristics, affecting both appearance and price.

Design and Style

The design and style of the garage door contribute to its cost. Standard designs with no intricate patterns are generally more budget-friendly, while custom designs or unique styles may increase the overall expense. Opener styles, especially those with advanced features or smart technology integration, may add to the overall cost.

Size and Dimensions

The size of the garage door directly impacts its cost. Larger doors require more material, and customization for specific dimensions may involve additional expenses. Opener components should be selected based on the weight and size of the garage door to ensure optimal performance.

Insulation Features

Opting for an insulated garage door adds to the cost but brings energy efficiency benefits. Insulated doors regulate temperature, providing comfort and potentially reducing energy bills. Opener components, such as motors with energy-efficient features, may also contribute to the overall expense.

Brand Reputation

The reputation of the garage door and opener manufacturer contributes to the overall cost. Established and reputable brands may offer products with higher price tags, reflecting a track record of quality and reliability. Lesser-known brands may provide more budget-friendly options.

Comparative Analysis with Other Garage Door and Opener Types

New vs. Replacement Garage Doors and Openers

Comparing the costs of installing completely new garage doors and openers with replacing existing ones helps homeowners understand the price difference. Installing entirely new systems may involve additional expenses, such as removing old doors and modifying the garage structure if needed.

Performance and Durability

Analyzing the performance and durability of various garage doors and openers aids homeowners in making decisions aligned with their preferences. Investing in durable and long-lasting components may justify a higher initial cost.

Cost Range for New Garage Doors and Openers

Basic Single Garage Doors with Standard Openers

Basic single garage doors, often made of steel, paired with standard openers, provide a cost-effective yet reliable option. These are suitable for homeowners looking for an affordable upgrade.

Custom Wood Garage Doors with Advanced Openers

For those seeking a luxurious and customizable option, custom wood garage doors paired with advanced openers provide a timeless and elegant appearance. However, they typically come with a higher price tag due to premium materials and features.

Aluminum Garage Doors with Smart Technology Openers

Aluminum garage doors, known for their lightweight and corrosion-resistant properties, paired with openers featuring smart technology integration, offer a modern and convenient solution. The combined cost may be higher due to advanced features.

Installation Costs and Considerations

DIY vs. Professional Installation

While some homeowners may attempt a do-it-yourself installation to save on labor costs, professional installation is recommended. Certified installers ensure proper alignment, functionality, and adherence to safety standards.

Hiring Certified Installers

Opting for professional installation comes with additional costs, but it guarantees a smooth and precise process. Certified installers possess the expertise to handle the intricacies of garage door and opener installations.

Warranty and Maintenance

Understanding Warranty Policies

New garage doors and openers often come with warranty coverage. Understanding the terms and conditions of the warranty is crucial for long-term satisfaction. Warranties may cover materials, parts, and, in some cases, installation.

Routine Maintenance Tips

Implementing routine maintenance practices is essential for preserving the longevity of new garage doors and openers. Simple tasks like lubricating moving parts, checking for wear and tear, and cleaning contribute to optimal performance.

Customer Satisfaction and Reviews

Online Customer Feedback

Exploring online platforms for customer feedback and reviews provides insights into the experiences of other homeowners with specific garage doors and openers. Positive reviews highlight reliability, while negative feedback may indicate potential concerns.

Common Positive and Negative Comments

Identifying common positive and negative comments about various garage doors and openers assists in making an informed decision. Look for recurring themes related to durability, ease of use, and overall satisfaction.

Tips for Making an Informed Purchase Decision

Assessing Garage Space and Needs

Consider the specific needs of your garage space when selecting new garage doors and openers. Factors such as insulation requirements, material preferences, and design aesthetics should guide your decision.

Budget Considerations

Set a budget for the new garage door and opener installation, factoring in material costs, design preferences, and additional features. A well-defined budget ensures that homeowners find a balance between quality and affordability.

Seeking Professional Advice

When uncertain, seek advice from professionals in the garage door industry. Certified technicians and specialists can provide guidance based on your garage specifications and budget constraints.

Conclusion:

In conclusion, the cost of new Madison Garage Door Repair involves a combination of material, design, insulation, size, and brand reputation. Understanding these factors, along with installation and maintenance considerations, empowers homeowners to make informed decisions that align with their preferences and budget.

A 24 Hour Door Service

417 Post Oak Cove, Madison, MS 39110, United States

1-601-664-8935

Garage Door Track Alignment: DIY Maintenance for 2023 – Celina Gates & Garage Door Repair

As a homeowner who takes pride in tackling do-it-yourself projects, one aspect of garage door maintenance that has proven both rewarding and essential is track alignment. The garage door’s smooth and efficient operation hinges on the proper alignment of its tracks, and neglecting this crucial maintenance task can lead to a host of issues, from annoying noises to potential safety hazards.

In this article, I’ll share my experiences and insights into the importance of garage door track alignment and provide a comprehensive DIY guide to ensure your garage door glides effortlessly along its tracks in 2023 by following Garage Door Repair.

Understanding the Significance of Garage Door Track Alignment

The tracks serve as the guiding system for your garage door, allowing it to move up and down smoothly. When the tracks are misaligned, it can lead to a range of problems that impact both the door’s performance and longevity. Here are some common issues associated with misaligned garage door tracks:

  1. Noisy Operation: Misaligned tracks often result in loud and disruptive noises during the door’s movement. These can include grinding, scraping, or popping sounds, indicating friction and misalignment issues.
  2. Uneven Movement: A garage door with misaligned tracks may exhibit uneven movement or become stuck at certain points in its path. This unevenness not only affects the door’s aesthetics but also puts additional strain on the opener system.
  3. Excessive Wear and Tear: When tracks are not aligned, the rollers and other components experience increased friction and wear. This can lead to premature deterioration of parts, necessitating more frequent repairs and replacements.
  4. Safety Concerns: Misaligned tracks pose safety risks, as they can cause the garage door to come off its tracks unexpectedly. This not only damages the door itself but also poses a potential threat to people and property in the vicinity.

Given these potential issues, addressing garage door track alignment is a proactive measure that ensures the door’s optimal functioning and helps prevent costly repairs down the line.

DIY Garage Door Track Alignment: Step-by-Step Guide

Before diving into the DIY process of aligning your garage door tracks, it’s important to note that if you’re uncomfortable or unsure about performing these tasks, it’s advisable to seek professional assistance. Safety should always be the top priority when working with heavy garage doors and their components.

Now, let’s explore a step-by-step guide for DIY garage door track alignment:

1. Gather the Necessary Tools and Materials:

  • A ladder
  • A level
  • Adjustable wrench
  • Hammer
  • Pliers
  • Screwdriver
  • Lubricant (silicone-based is recommended)

2. Perform a Visual Inspection: Start by visually inspecting the tracks. Look for any obvious signs of misalignment, such as gaps between the rollers and the tracks or bends in the tracks themselves. Identify areas that may require adjustment.

3. Check for Loose Hardware: Use a wrench to tighten any loose nuts, bolts, or screws on the tracks, rollers, and brackets. Loose hardware can contribute to misalignment, so ensuring everything is securely fastened is a crucial first step.

4. Use a Level to Check Alignment: Place a level along the horizontal and vertical sections of each track to assess their alignment. Ideally, the tracks should be perfectly vertical and parallel to each other. If you notice any deviations, adjustments are needed.

5. Adjust Vertical Track Alignment:

  • To adjust the vertical tracks, loosen the screws or bolts securing the track to the wall.
  • Gently tap the track with a hammer to move it into the correct position.
  • Use the level to ensure that the track is perfectly vertical.
  • Once aligned, tighten the screws or bolts securely.

6. Adjust Horizontal Track Alignment:

  • For horizontal tracks, you may need to loosen the screws or bolts on the track’s brackets.
  • Move the track left or right as necessary to achieve proper alignment.
  • Use the level to ensure the track is perfectly horizontal.
  • Securely tighten the screws or bolts once alignment is achieved.

7. Inspect Roller Alignment:

  • Examine each roller to ensure they are properly aligned within the tracks.
  • If a roller appears misaligned, use pliers to adjust it by bending the bracket slightly.
  • Ensure all rollers move freely within the tracks without binding.

8. Lubricate Moving Parts:

  • Apply a silicone-based lubricant to the rollers, hinges, and other moving parts. Lubrication helps reduce friction and ensures smooth operation.

9. Test the Door’s Operation:

  • After making adjustments, manually lift and lower the garage door to test its operation.
  • Listen for any unusual noises and observe the door’s movement to ensure it travels smoothly along the tracks.

10. Conduct a Final Inspection:

  • Once satisfied with the adjustments, conduct a final visual inspection of the entire system.
  • Check for any remaining signs of misalignment or loose hardware.
  • Address any lingering issues promptly.

Safety Precautions:

  • Always disconnect the garage door opener from power before attempting any adjustments.
  • Use caution when working on a ladder, ensuring it is stable and positioned on a flat surface.
  • If the garage door is too heavy or if you encounter difficulties during the process, seek professional assistance.

Conclusion: Enjoying the Fruits of Your DIY Labor

Taking the time to align your garage door tracks is a DIY maintenance task that pays dividends in terms of smoother operation, reduced noise, and prolonged system longevity. By following this comprehensive guide and conducting regular visual inspections, you can ensure that your garage door continues to function optimally throughout 2023 and beyond.

Based from Garage Door Repair, as a homeowner who appreciates the satisfaction of tackling home improvement tasks independently, aligning your garage door tracks becomes a fulfilling endeavor that contributes to the overall well-being of your home. Remember, if at any point you feel uncertain or uncomfortable with the process, seeking professional assistance is a prudent choice to guarantee both your safety and the optimal performance of your garage door system.

Celina Gates & Garage Door Repair

211 S Ohio Dr, Celina, TX 75009, United States

214-833-9968

Garage Door Roller Replacement: DIY or Professional Assistance? – Solana Beach Garage & Overhead Doors

As a conscientious homeowner, the rhythmic symphony of my garage door opening and closing had become a familiar soundtrack to my daily routine. However, as time marched on, the occasional creaks and groans began to disrupt this harmony, signaling the wear and tear of the garage door rollers.

As stated in Garage Door Repair, faced with the prospect of garage door roller replacement, I found myself standing at a crossroads—should I embark on a DIY journey or seek the expertise of professionals? In this exploration, I unravel the considerations, challenges, and rewards of both paths, navigating the terrain of garage door roller replacement.

1. The Role of Garage Door Rollers: Silent Heroes of Operation

Before delving into the decision-making process, it’s essential to understand the pivotal role played by garage door rollers. These seemingly humble components are the silent heroes that allow the garage door to move smoothly along the tracks. Over time, they bear the brunt of the door’s weight and the constant friction, making them susceptible to wear and deterioration.

2. Signs of Roller Wear: Deciphering the Language of Sounds

The first step in determining whether garage door roller replacement is in order involves listening to the language of sounds. Signs of roller wear include:

  • Creaking or Grinding Noises: If the garage door emits creaking or grinding noises during operation, it’s a telltale sign that the rollers are experiencing increased friction.
  • Uneven Movement: A garage door that moves unevenly or jerks during operation may indicate roller issues. Damaged or worn rollers can disrupt the smooth movement of the door.
  • Visible Wear and Tear: Inspection of the rollers may reveal visible signs of wear, such as cracks, chips, or flat spots. These are indicators that the rollers have reached the end of their operational life.

3. The DIY Odyssey: Embarking on a Roller Replacement Journey

Armed with an adventurous spirit and a toolbox, the prospect of a DIY garage door roller replacement beckoned. Here are the key steps involved in the DIY odyssey:

  • Gather the Essentials: The DIY journey begins with gathering the essential tools and replacement rollers. A sturdy ladder, a socket set, and a set of high-quality replacement rollers compatible with the garage door model are paramount.
  • Safety First: Before initiating any work, safety takes center stage. Disconnect the garage door opener from power to prevent accidental activation. Use safety glasses and gloves to protect against debris and sharp edges.
  • Secure the Door: To prevent the door from moving unexpectedly, secure it in the open position using clamps or locking pliers. This step ensures a stable working environment during roller replacement.
  • Removing the Old Rollers: With the door secured, use a socket wrench to remove the bolts securing the brackets holding the old rollers. Slide the old rollers out of the tracks, taking note of their placement for accurate installation of the new ones.
  • Installing the New Rollers: Slide the new rollers into the tracks, aligning them with precision. Once in position, secure the brackets back in place using the socket wrench. Ensure that the rollers move freely within the tracks.
  • Testing the Door: With the new rollers in place, carefully release the clamps or locking pliers and test the door’s movement. Listen for any abnormal noises and observe the smoothness of operation.

4. The Professional Passage: Entrusting Roller Replacement to Experts

Alternatively, the professional passage involves enlisting the services of experienced garage door technicians. Here are the key aspects of choosing professional assistance for garage door roller replacement:

  • Expertise and Experience: Professional technicians bring a wealth of expertise and experience to the table. They can quickly diagnose roller issues, identify additional problems, and execute the replacement with precision.
  • Efficiency and Speed: Professionals are adept at efficiently completing garage door roller replacement. Their familiarity with the process allows them to work swiftly without compromising on the quality of the replacement.
  • Access to Quality Parts: Garage door professionals often have access to high-quality replacement parts, including premium rollers designed for durability and longevity. This ensures a reliable and lasting solution.
  • Comprehensive Inspection: Beyond roller replacement, professionals conduct a comprehensive inspection of the entire garage door system. This includes assessing the condition of other components, such as tracks, hinges, and springs, identifying potential issues before they escalate.
  • Warranty and Guarantee: Reputable garage door service providers offer warranties and guarantees on their work. This provides peace of mind, knowing that the replacement work is backed by the confidence of the professionals.

5. Weighing the Considerations: DIY vs. Professional Assistance

As I stood at the decision-making crossroads, weighing the considerations of DIY versus professional assistance, several factors emerged as pivotal:

  • Skill and Comfort Level: Assessing my skill level and comfort with DIY projects played a crucial role. While the process of garage door roller replacement is relatively straightforward, comfort with using tools and following precise steps is essential for a successful DIY venture.
  • Time Constraints: DIY projects, although rewarding, demand time and attention to detail. Considering my schedule and the urgency of the roller replacement, the efficiency of professional assistance became an appealing option.
  • Cost Considerations: DIY projects often come with the allure of cost savings. However, factoring in the cost of quality replacement rollers, tools, and the value of time spent, professional assistance can present a cost-effective solution.
  • Risk Mitigation: The potential for complications or unforeseen challenges during DIY projects is a reality. Professional assistance mitigates this risk, ensuring a smooth and expertly executed roller replacement.

6. The Hybrid Approach: Collaboration for Success

In the spirit of compromise, a hybrid approach emerged—a collaboration between the DIY spirit and professional expertise. Here’s how this hybrid approach unfolded:

  • DIY Roller Removal: Armed with the tools and a sense of adventure, I opted to handle the initial stage of roller removal. This allowed me to engage in the hands-on aspect of the project and reduce the overall service cost.
  • Professional Installation: Recognizing the critical nature of precise installation, I opted to enlist professional assistance for the installation of the new rollers. This ensured that the replacement was executed with precision, addressing any potential alignment issues.

7. Post-Replacement Maintenance: Sustaining the Symphony

Regardless of the chosen path—DIY, professional assistance, or a hybrid approach—post-replacement maintenance is crucial for sustaining the smooth symphony of the garage door. This involves:

  • Lubrication: Applying a high-quality garage door lubricant to the rollers ensures smooth movement and reduces friction. This simple yet effective maintenance task enhances the lifespan of the rollers.
  • Regular Inspection: Conducting periodic inspections of the garage door system allows for the early detection of any issues. This includes checking for loose bolts, misalignments, or signs of wear that may impact the rollers.
  • Addressing Abnormal Noises: Unusual sounds during garage door operation may indicate underlying issues. Promptly addressing these noises and investigating their source can prevent potential complications.

Conclusion: Harmony Restored, Decision Concluded

As I reflect on the journey of garage door roller replacement, the decision to embark on a DIY adventure, seek professional assistance, or find a middle ground becomes a personal narrative. The symphony of my garage door’s operation is now harmonious once more, thanks to the careful consideration of options and the proactive approach to maintenance.

Based from Garage Door Repair, in navigating the terrain of garage door roller replacement, I discovered that the decision-making process is as intricate as the components themselves. Whether embracing the DIY spirit, opting for professional expertise, or finding a collaborative balance, the ultimate goal is to restore the silent harmony of the garage door—a gateway to my home’s sanctuary.

Solana Beach Garage & Overhead Doors

1034 Santa Helena Park Ct, Solana Beach, CA 92075, United States

858-648-5118

Adjusting Garage Door Sensors: Ensuring Proper Operation – Palm Springs Garage & Overhead Doors

As a meticulous homeowner, the harmonious operation of every element in my living space is essential. Recently, I found myself immersed in the world of garage door maintenance, specifically focusing on the often-overlooked yet crucial components—the garage door sensors.

In this exploration, join me as I unravel the intricacies of adjusting garage door sensors, delving into the importance of precise alignment and the steps to ensure their proper operation by following Garage Door Repair.

1. The Sentinel of Safety: Understanding the Role of Garage Door Sensors

Before delving into the art of adjustment, it’s imperative to comprehend the vital role that garage door sensors play in the overall functionality of the system. Positioned near the base of the garage door opening, these sensors are a dynamic duo, consisting of a sender and a receiver. Their primary function is to detect obstacles or obstructions in the path of the closing door, preventing accidents and damage.

The sender emits an infrared beam, and the receiver, positioned on the opposite side, is designed to receive this beam. When an object, be it a person, pet, or any obstruction, interrupts the infrared beam, it triggers the sensors to halt the closing process, ensuring the door retracts and avoids contact with the obstruction. This critical safety feature prevents accidents and damage, making it a non-negotiable component of a well-maintained garage door system.

2. The Symphony of Precision: Why Adjusting Garage Door Sensors Matters

The seamless orchestration of a garage door’s movement hinges on precision, and the alignment of sensors is a key conductor in this symphony. The sensors must be meticulously adjusted to ensure they operate with pinpoint accuracy. Here’s why this precision matters:

  • Safety First: The foremost reason for adjusting garage door sensors is safety. A misaligned sensor can lead to a failure in detecting obstacles, compromising the safety of people and pets in the vicinity. Accurate alignment ensures that the sensors are sensitive to any interruption in the infrared beam, promptly triggering the reversal of the door.
  • Preventing Damage: Beyond safety concerns, precise sensor alignment protects the garage door itself. A well-aligned sensor system prevents the door from closing on objects, vehicles, or even the garage door itself. This not only extends the lifespan of the door but also minimizes the need for costly repairs resulting from collisions.
  • Smooth Operation: Misaligned sensors can cause unnecessary interruptions in the door’s operation. A door that repeatedly stops and reverses due to sensor issues can be frustrating and inconvenient. Properly adjusted sensors contribute to the smooth and efficient operation of the garage door, enhancing the overall user experience.

3. The Art of Alignment: Steps to Adjust Garage Door Sensors

Embarking on the journey of adjusting garage door sensors is a task that requires patience, precision, and attention to detail. Here is a step-by-step guide to ensure accurate sensor alignment:

  • Safety First: Before attempting any adjustments, prioritize safety. Ensure that the garage door is fully open and remains in that position throughout the adjustment process. Disconnect the power to the garage door opener to prevent any inadvertent movements.
  • Visual Inspection: Begin by conducting a visual inspection of the sensors. Check for any obvious signs of damage, such as broken wires, loose connections, or dirt obstructing the sensor lenses. Clean the lenses with a soft, dry cloth to ensure clear visibility.
  • Positioning of Sensors: The sensors are typically installed on either side of the garage door, near the floor. Ensure that both sensors are at the same height and are facing each other directly. Use a level to confirm that they are aligned horizontally.
  • Adjustment Screws: Most garage door sensors are equipped with adjustment screws that allow for fine-tuning. These screws control the angle of the sensor, influencing the direction of the infrared beam. Use a screwdriver to make subtle adjustments to the screws, aiming to align the sensors precisely.
  • Inching Towards Alignment: Make small adjustments and regularly check the alignment by observing the indicator lights on the sensors. When properly aligned, the indicator lights will typically show a steady, non-blinking glow. Continue making minor adjustments until both sensors are aligned, and the indicator lights confirm this alignment.
  • Testing the System: With the sensors aligned, it’s time to test the garage door system. Reconnect the power to the garage door opener and activate the door to close. Place an obstacle, such as a box or a piece of cardboard, in the path of the closing door. The door should detect the obstruction and reverse its movement. If it doesn’t, revisit the alignment and make further adjustments as needed.
  • Ongoing Observation: After adjustment and successful testing, it’s crucial to keep an eye on the sensors. Regularly check for any signs of misalignment, and address issues promptly. Changes in weather, vibrations, or accidental nudges can impact sensor alignment over time.

4. Troubleshooting Challenges: Addressing Common Sensor Issues

While the adjustment process is straightforward, homeowners may encounter common challenges along the way. Understanding these challenges and their solutions adds another layer of expertise to the homeowner’s toolkit:

  • Interference from Sunlight: Direct sunlight can interfere with sensor operation, causing false readings. If sunlight hits the sensors directly, consider installing shades or shields to protect them from sunlight. Alternatively, use anti-glare shields provided by some sensor manufacturers.
  • Dirty or Obstructed Lenses: Dust, dirt, or spider webs can accumulate on the sensor lenses, affecting their performance. Regularly clean the lenses with a soft, dry cloth to maintain clear visibility. Avoid using abrasive materials that could scratch the lenses.
  • Loose Wiring or Connections: Check for any loose wiring or connections at the sensors. Ensure that the wires are securely connected to the sensors and that there are no exposed or damaged wires. Tighten any loose connections to maintain a reliable electrical connection.
  • Sensor Misalignment Over Time: Vibrations, shifts in the foundation, or accidental bumps can lead to gradual sensor misalignment. It’s advisable to periodically check and adjust the sensors to maintain their accuracy.
  • Faulty Sensor Components: In some cases, sensor issues may be attributed to faulty components. If adjustments and troubleshooting efforts do not resolve the issue, it may be necessary to replace one or both of the sensors. Consult the manufacturer’s guidelines for sensor replacement.

5. A Proactive Approach: Regular Maintenance for Garage Door Sensors

Adjusting garage door sensors is just one facet of proactive maintenance that contributes to the longevity and reliable performance of the entire garage door system. Here are additional maintenance tips to adopt a comprehensive approach:

  • Lubrication: Regularly lubricate moving parts of the garage door, including hinges, rollers, and springs. This minimizes friction, reduces wear and tear, and ensures smooth operation.
  • Balance Check: Periodically check the balance of the garage door. A balanced door requires less strain on the opener and other components, promoting longevity.
  • Opener Inspection: Inspect the garage door opener for any signs of wear, damage, or unusual noises. Addressing opener issues promptly contributes to the overall efficiency of the system.
  • Weather Stripping: Check and replace weather stripping as needed. Proper weather stripping enhances energy efficiency, prevents drafts, and protects the garage interior from the elements.
  • Sensor Cleaning: Beyond alignment adjustments, regularly clean the sensor lenses to maintain optimal functionality. Clear lenses contribute to accurate detection of obstacles.
  • Professional Inspection: Consider scheduling periodic professional inspections. A trained technician can identify potential issues, conduct thorough assessments, and provide expert recommendations for maintenance and repairs.

Conclusion: A Symphony of Safety and Precision

As I immersed myself in the realm of adjusting garage door sensors, I realized that this seemingly minor task plays a pivotal role in the safety and functionality of the entire garage door system. The precision required in aligning sensors is akin to orchestrating a symphony, where each instrument must be in tune to achieve harmony.

Overall, based from Garage Door Repair, by adopting a proactive approach to sensor maintenance and adjustments, homeowners can ensure that their garage doors operate seamlessly, providing a safe and reliable entrance to their homes. The art of adjusting garage door sensors is not merely a technical task; it’s a commitment to the safety and well-being of those who call a house a home. In the symphony of homeownership, the precision of garage door sensors stands as a vigilant sentinel, orchestrating a melody of safety and precision with every open and close.

Palm Springs Garage & Overhead Doors

1877 E Amado Rd, Palm Springs, CA 92262, United States

760-239-5657

Roll-Up Garage Doors for Small Spaces: Space-Saving Solutions – El Cajon Overhead & Garage Doors

In the quest for maximizing space efficiency within the confines of my compact living environment, I found myself drawn to the ingenuity of roll-up garage doors. Far beyond their traditional use in larger garages, these space-saving solutions emerged as versatile additions to small spaces, providing a seamless blend of functionality and aesthetics.

Join me on this exploration of roll-up garage doors, uncovering their transformative potential for those navigating the challenges of limited space by following Garage Door Repair.

1. The Evolution of Garage Doors: Adapting to Compact Living

As someone living in a cozy urban apartment with limited square footage, the conventional notion of a garage door seemed worlds away. However, the evolution of architectural and design trends has ushered in a new era where roll-up garage doors are not reserved solely for expansive garages. Architects and homeowners alike are reimagining the possibilities, integrating these doors into smaller spaces to achieve a harmonious balance between indoor and outdoor living.

2. Unveiling the Compact Marvel: What Are Roll-Up Garage Doors?

Roll-up garage doors, also known as coiling or rolling doors, are a space-saving alternative to traditional overhead garage doors. Unlike their sectional counterparts that move along tracks on the ceiling, roll-up doors coil into a compact roll above the door opening. This design eliminates the need for horizontal tracks, making them ideal for settings with limited ceiling space.

These doors consist of horizontal slats or panels hinged together, allowing them to roll up into a drum-like enclosure. The vertical opening mechanism ensures that the door takes up minimal space, making it a practical solution for small garages, patios, or even interior room dividers.

3. Versatility Unleashed: Applications Beyond Traditional Garages

The versatility of roll-up garage doors extends far beyond the realm of conventional garages. As I explored the possibilities, I discovered a myriad of applications that showcased their adaptability to diverse living spaces:

  • Compact Garages: In urban settings where garage space is a premium, roll-up doors offer a space-efficient solution. Their vertical opening design eliminates the need for extensive ceiling clearance, making them ideal for tight spaces.
  • Patios and Outdoor Living Areas: Roll-up doors seamlessly merge indoor and outdoor spaces, creating a fluid transition between a living room and a patio or balcony. This design fosters a sense of openness and enhances the overall living experience.
  • Workspace Dividers: For those carving out home offices or creative workspaces within limited square footage, roll-up doors serve as dynamic room dividers. They allow for a flexible layout, providing the option to open up the space or create private, defined areas.
  • Retail and Commercial Spaces: The commercial realm has embraced the versatility of roll-up garage doors. From small boutique storefronts to trendy cafes, these doors add a touch of modernity and functionality, allowing businesses to maximize their space and engage with passersby.
  • Interior Design Accents: Roll-up doors aren’t confined to external spaces. Within homes, they can serve as unique design elements, separating living areas or concealing storage spaces. The customizable nature of these doors allows for a seamless integration into various interior aesthetics.

4. The Aesthetics of Efficiency: Design Options and Customization

One of the aspects that captivated me about roll-up garage doors was the range of design options and customization possibilities. These doors are not merely utilitarian; they are aesthetic features that contribute to the overall ambiance of a space. Here are some design considerations that make roll-up doors a visually appealing choice:

  • Material Variety: Roll-up garage doors are available in a variety of materials, allowing homeowners to choose a style that complements their overall design vision. From sleek aluminum to rustic wood, the material options cater to diverse preferences.
  • Finish and Color Choices: The finish and color of a roll-up door can be customized to harmonize with the existing design palette. Whether aiming for a minimalist monochrome look or a bold statement piece, the color options are extensive.
  • Window Inserts: Many roll-up doors feature window inserts or panels that add an extra dimension to the design. These windows not only allow natural light to filter into the space but also contribute to the overall aesthetic appeal.
  • Hardware and Accessories: The hardware and accessories chosen for a roll-up door can enhance its visual impact. From contemporary handles to decorative hinges, these elements contribute to the overall design language of the door.
  • Texture and Patterns: For those seeking a textured or patterned look, certain materials, such as wood, offer opportunities for customization. Carved patterns, textured finishes, or even custom prints can elevate the design of the door.

5. Operation Unveiled: Understanding the Mechanics of Roll-Up Doors

The seamless operation of roll-up garage doors adds to their allure, making them not only visually appealing but also user-friendly. The mechanics behind these doors contribute to their space-saving functionality:

  • Vertical Opening: Unlike traditional garage doors that swing outward or move horizontally along tracks, roll-up doors open vertically. This vertical movement allows for efficient use of space and eliminates the need for extensive ceiling clearance.
  • Compact Coil Design: When the door is in the open position, it coils into a compact roll above the door opening. This design ensures that the door doesn’t encroach on the interior or exterior space, making it an ideal choice for settings with limited square footage.
  • Smooth Rolling Mechanism: The horizontal slats or panels that make up the door are connected and roll smoothly along a track. This ensures a fluid and controlled movement, contributing to the overall user experience.
  • Manual or Motorized Options: Roll-up doors offer both manual and motorized operation. While manual doors are operated by pulling the door down or releasing it to roll up, motorized options provide the convenience of remote control or smart home integration.
  • Space-Efficient Storage: When the door is in the open position, the compact coil design neatly stores the door above the opening. This storage method ensures that the space above the door remains accessible and unobstructed.

6. Installation Chronicles: What to Expect When Incorporating Roll-Up Doors

As I contemplated the prospect of integrating roll-up doors into my living space, I delved into the installation process to understand what to expect. Whether considering these doors for a garage, patio, or interior space, the installation chronicles unfolded as follows:

  • Professional Consultation: The journey typically begins with a consultation with a professional installer. During this consultation, the installer assesses the space, discusses design preferences, and provides recommendations based on the intended use of the roll-up door.
  • Measurement and Customization: Accurate measurements are crucial for a seamless fit. The installer takes precise measurements of the door opening to ensure that the roll-up door is customized to the specific dimensions. Customization options, including material selection and design features, are also discussed.
  • Preparation of the Opening: Depending on the existing structure, some preparation may be required for the installation. This could involve reinforcing the surrounding structure to support the weight of the door and ensuring a smooth surface for the door to roll up into.
  • Installation of Tracks and Components: The installation process involves securing tracks above the door opening, which guide the movement of the door. The horizontal slats or panels are then connected, and the entire assembly is installed with precision.
  • Motorization (Optional): For motorized roll-up doors, the motor and control system are installed. This often includes the integration of remote control capabilities or compatibility with smart home systems for convenient operation.
  • Final Adjustments and Testing: Once the roll-up door is in place, the installer makes final adjustments to ensure smooth operation. This includes checking the alignment of the door, adjusting tension settings, and conducting thorough testing to verify functionality.

7. The Seamless Integration: Embracing Roll-Up Doors in Small Spaces

As the roll-up doors seamlessly integrated into my living space, I marveled at their transformative impact on the overall dynamics of the environment. The benefits of this space-saving solution became increasingly evident:

  • Expanded Living Spaces: Roll-up doors effortlessly blur the boundaries between indoor and outdoor living. Opening the door creates a sense of expansiveness, allowing natural light and fresh air to flood the space. It’s a spatial transformation that transcends the limitations of square footage.
  • Enhanced Flexibility: The flexibility afforded by roll-up doors is a game-changer in small spaces. Whether converting a garage into a multifunctional space or creating a versatile home office with the option to open up to the outdoors, these doors provide adaptability to changing needs.
  • Natural Light Influx: The inclusion of window inserts in the roll-up door design invites an abundance of natural light into the interior. This not only contributes to a brighter and more inviting atmosphere but also reduces the reliance on artificial lighting.
  • Architectural Harmony: The sleek and modern design of roll-up doors adds a touch of contemporary elegance to any space. Their ability to harmonize with various architectural styles makes them a versatile choice for both traditional and modern settings.
  • Increased Property Value: The integration of roll-up doors can enhance the overall appeal and market value of a property. Potential buyers or renters are likely to appreciate the unique and functional feature, contributing to the property’s desirability.

Conclusion: A Compact Symphony of Space and Style

Overall, based from Garage Door Repair, in the symphony of compact living, roll-up garage doors emerged as a virtuoso, orchestrating a seamless blend of space-saving solutions and aesthetic appeal. Their transformative potential extends beyond the conventional confines of garages, opening doors—quite literally—to innovative design possibilities for small spaces.

As I continue to revel in the newfound versatility and visual impact of roll-up doors within my living space, I am reminded that the boundaries of design are continually expanding. These doors serve as a testament to the evolving landscape of architectural possibilities, challenging preconceived notions and inviting homeowners to reimagine the potential hidden within the compact dimensions of their living environments.

El Cajon Overhead & Garage Doors

238 Lento Ln, El Cajon, CA 92021, United States

619-503-3574

Customizing Your Garage Door: Materials, Colors, and Accessories – Santee Gates & Garage Doors

As a homeowner, the quest for individuality and personalization extends beyond the confines of interior spaces. The exterior, often the first impression guests and passersby receive, holds a unique opportunity for self-expression.

My journey into customizing garage doors became a fascinating exploration of materials, colors, and accessories, transforming this functional element into a statement of personal style by following Garage Door Repair.

1. The Canvas of Creativity: Understanding the Power of Customization

The garage door, once a utilitarian necessity, emerged as an unexpected canvas for creativity. The realization dawned that customization wasn’t just about choosing materials; it was a comprehensive process that involved marrying functionality with aesthetic appeal.

  • Materials as the Foundation: The journey began with an exploration of materials. Understanding the characteristics, durability, and design possibilities of each material laid the foundation for a garage door that not only looked appealing but also stood the test of time.
  • Colors as the Palette: Colors play a pivotal role in personalization. The garage door became a palette, and the choice of colors went beyond mere aesthetics. It became a reflection of mood, architectural harmony, and even environmental considerations.
  • Accessories as the Finishing Touch: Accessories, often overlooked, were the finishing touch in the customization process. From handles to decorative hardware, these seemingly small elements added character and nuance, elevating the garage door from a functional necessity to a work of art.

2. The Material Dilemma: Exploring Options for Durability and Style

Choosing the right material for a garage door is a critical decision, blending considerations of durability, maintenance, and aesthetic preferences. My exploration into materials revealed a diverse array of options, each with its unique characteristics.

  • Steel: The Epitome of Durability: Opting for steel was a nod to durability. Steel garage doors, known for their strength and resistance to elements, provided a robust solution. The material’s ability to withstand dents and scratches ensured longevity, making it an ideal choice for homeowners seeking a low-maintenance yet sturdy option.
  • Wood: A Timeless Elegance: For those inclined towards classic aesthetics, wood emerged as a timeless choice. The warmth and natural beauty of wood added a touch of elegance to the exterior. However, the decision to embrace wood came with the acknowledgment of the need for regular maintenance to preserve its charm.
  • Aluminum: Modern Simplicity: Seeking a modern and lightweight option led me to explore aluminum. Known for its corrosion resistance and versatility, aluminum garage doors offered a sleek and contemporary look. The material’s inherent resistance to rust made it particularly suitable for coastal regions.
  • Fiberglass: The Resilient Alternative: Fiberglass presented itself as a resilient alternative. With its resistance to salt air and humidity, fiberglass garage doors became an attractive option for those residing in coastal areas. The material’s ability to mimic the look of wood without the maintenance demands added to its allure.

3. Colors that Speak Volumes: Infusing Personality into the Palette

The choice of colors was a pivotal moment in the customization process. It was more than just selecting hues; it was about infusing personality into the palette, ensuring that the garage door resonated with the overall aesthetic of the home.

  • Neutrals for Timeless Elegance: Neutral tones, such as beige, gray, and white, became the foundation for timeless elegance. These colors not only complemented a variety of architectural styles but also provided a versatile backdrop for the changing seasons and landscaping.
  • Bold Statements with Vibrant Hues: For those inclined towards bold statements, vibrant hues offered an exciting avenue for personal expression. Deep blues, rich greens, or even striking reds became a way to make a visual impact and turn the garage door into a focal point of the exterior.
  • Wood Stains for Natural Warmth: Choosing wood prompted the exploration of wood stains. These stains, ranging from light oak to dark mahogany, allowed me to retain the natural texture of the wood while enhancing its warmth. The ability to customize wood stains ensured a harmonious integration with the home’s overall color scheme.
  • Contrast and Accents for Visual Interest: Experimenting with contrast became a tool for adding visual interest. Dark garage doors against light exteriors or vice versa created a striking contrast, while accent colors, carefully chosen for handles and trims, added subtle touches that spoke volumes.

4. The Art of Accessories: Elevating the Garage Door Aesthetics

Accessories, often relegated to functional necessities, emerged as the unsung heroes of garage door customization. These seemingly small elements had the power to elevate aesthetics, turning a standard garage door into a personalized masterpiece.

  • Handles and Hinges as Design Elements: Traditional handles and hinges took on a new role as design elements. Choosing handles that echoed the architectural style of the home or opting for decorative hinges added a touch of sophistication. These details weren’t just functional; they were the nuances that made the garage door uniquely mine.
  • Decorative Hardware for Character: Exploring decorative hardware was a revelation in adding character. From wrought-iron handles to magnetic faux windows, these accessories provided an opportunity to inject personality. The interplay of textures and materials in hardware became the finishing touch that transformed the garage door from generic to extraordinary.
  • Windows for Light and Style: Windows, strategically placed, introduced a play of light and shadow. Choosing window designs that aligned with the overall aesthetic of the home brought a sense of cohesion. The thoughtful placement of windows wasn’t just about aesthetics; it also contributed to the functional aspect by allowing natural light into the garage space.
  • Smart Technology Integration: The era of smart homes prompted the consideration of technology integration. Smart garage door openers and security features seamlessly became part of the customization process. The convenience of controlling the garage door remotely added a layer of modernity to the overall customization journey.

5. DIY vs. Professional Assistance: Navigating the Customization Terrain

As I delved deeper into the customization process, the question arose: to DIY or seek professional assistance? Navigating this terrain involved weighing factors such as skill level, time constraints, and the complexity of the chosen customization elements.

  • DIY for Personal Touch: Opting for a DIY approach allowed me to infuse a personal touch into the customization. Painting the garage door, adding handles, and experimenting with accessories became hands-on projects that reflected my vision. However, it’s essential to assess one’s skill level and the scope of the customization to ensure a successful outcome.
  • Professional Assistance for Precision: Certain customization elements, especially those involving structural changes or intricate installations, benefited from professional expertise. Seeking the assistance of professionals ensured precision in the placement of windows, the application of finishes, and the integration of technology. Their experience streamlined the process and enhanced the overall quality of customization.

6. Sustainability in Customization: A Green Perspective

As a homeowner with an environmental consciousness, sustainability became a factor in the customization journey. The materials chosen, the paint finishes selected, and even the energy efficiency of the garage door itself were considerations that aligned with a green perspective.

  • Sustainable Materials: Opting for sustainable materials, such as recycled steel or eco-friendly wood composites, became a conscious choice. These materials not only contributed to the longevity of the garage door but also reduced the environmental impact.
  • Low-VOC Paints: Choosing low-VOC (volatile organic compound) paints for the garage door finishes minimized the release of harmful chemicals into the environment. This eco-friendly approach extended the lifespan of the customization while aligning with sustainable living practices.
  • Energy-Efficient Options: Exploring energy-efficient garage door options, including insulation materials, contributed to the overall sustainability of the customization. An energy-efficient garage door not only regulated temperatures in the garage space but also reduced the overall energy consumption of the home.

7. The Impact of Customization: A Transformed Exterior Landscape

The culmination of the customization journey was a garage door that seamlessly integrated into the exterior landscape, reflecting my personality, preferences, and the unique character of my home.

  • Curb Appeal Enhancement: The customized garage door became a focal point of curb appeal, enhancing the overall attractiveness of the home. The personalized touches, from color choices to decorative hardware, contributed to a cohesive and inviting exterior.
  • Architectural Harmony: The garage door, once a functional element, now played a role in architectural harmony. The choice of materials and colors ensured that the garage door complemented the architectural style of the home, creating a visual symphony rather than a discordant note.
  • Neighborly Aesthetics: The impact of customization extended beyond personal satisfaction to the neighborhood landscape. A thoughtfully customized garage door contributed positively to the aesthetics of the entire street, creating a harmonious visual narrative.

8. Lessons Learned: Beyond Aesthetics in Garage Door Customization

The journey into customizing my garage door imparted lessons that transcended the realm of aesthetics, touching on practicality, sustainability, and the synergy between form and function.

  • Balance of Form and Function: Customization, while a creative endeavor, requires a balance between form and function. Every aesthetic choice made during the customization process had a functional implication, from material durability to energy efficiency.
  • Sustainability as a Guiding Principle: The environmental impact of customization should be a guiding principle. Opting for sustainable materials, eco-friendly finishes, and energy-efficient options contributed to a garage door customization journey that aligned with responsible living.
  • Personalization is an Evolution: Customization is not a one-time endeavor but an evolving process. As personal preferences change and architectural styles evolve, the garage door customization journey becomes a continuum. Choosing materials and elements with adaptability in mind ensures that the garage door can grow with the homeowner.

Conclusion: The Garage Door as a Personal Masterpiece

In the tapestry of home customization, the garage door emerged as a thread of personal expression. The exploration of materials, colors, and accessories was not merely a journey in exterior design; it was a quest for individuality, creativity, and the transformation of a functional element into a personal masterpiece.

Overall, by following Garage Door Repair, as I stand before my customized garage door, I’m reminded that it is more than just an entrance to a functional space. It is a canvas that reflects my personality, a testament to the harmonious synergy between individuality and architectural aesthetics. The garage door, once overlooked, is now a statement, an extension of my home’s narrative, and a testament to the transformative power of customization.

Santee Gates & Garage Doors

110 Town Center Pkwy Suite #21, Santee, CA 92071, United States

619-377-1538

How To Frame For A Garage Door – BH Garage Doors and Gates

Framing for a Garage Door Repair Rockwall TX is a crucial step in the construction or renovation of a garage.

The framing process involves creating the structural framework that supports the garage door and ensures its proper functioning. In this comprehensive guide, I’ll take you through the step-by-step process of framing for a garage door.

1. Gather Materials and Tools: Before you start framing, gather the necessary materials and tools. You’ll need lumber, framing nails or screws, a level, a framing square, a circular saw, a drill, a tape measure, and safety gear such as gloves and safety glasses.

2. Measure and Mark the Opening: Begin by measuring the width and height of the garage door. Typically, the rough opening (the framed opening before the door is installed) should be 2 inches wider than the garage door and 1 inch taller. Use these measurements to mark the opening on the header, jambs, and sill.

3. Cut the Header: The header is a horizontal beam that spans the top of the garage door opening, supporting the load above the door. Cut the header from a piece of lumber that matches the width of the rough opening. Use a framing square to ensure precise and square cuts.

4. Install the Header: Position the header at the top of the rough opening and secure it in place using framing nails or screws. Ensure that the header is level and properly aligned with the markings on the jambs. This header provides crucial support for the garage door.

5. Cut and Install the Jambs: The jambs are vertical framing members that form the sides of the garage door opening. Cut two pieces of lumber to the height of the rough opening. Secure the jambs to the framing using nails or screws, ensuring they are plumb (vertically straight) and properly aligned.

6. Install the Sill Plate: The sill plate is a horizontal member that rests on the foundation and supports the jambs. Cut a piece of lumber to match the width of the rough opening and install it at the bottom. Secure the sill plate to the foundation using anchor bolts or screws.

7. Add King and Jack Studs: King studs run continuously from the top plate to the bottom plate on both sides of the garage door opening. Jack studs are shorter vertical members that support the header. Install king studs on each side of the opening, and then add jack studs next to them, providing additional support for the header.

8. Install Trimmer Studs: Trimmer studs run from the top plate to the bottom plate on both sides of the garage door opening, adjacent to the king and jack studs. They help distribute the load of the header. Install trimmer studs next to each king and jack stud.

9. Check for Plumb and Level: Use a level to ensure that the jambs, header, and all framing members are plumb and level. Adjust as needed before securing everything in place.

10. Reinforce with Bracing: To strengthen the framing, add diagonal bracing between the jambs and the header. This helps prevent the garage door opening from shifting over time. Secure the bracing with nails or screws.

11. Install Additional Support (if needed): Depending on the size and weight of the garage door, you may need additional support. Consult the garage door manufacturer’s specifications and local building codes. Additional support can include lintel bars or other structural elements.

12. Insulate and Finish: If insulation is part of your garage design, install it between the framing members. After framing, you can proceed with adding sheathing, exterior siding, and any other finishing materials according to your design preferences.

13. Consult Local Codes and Regulations: Before starting the framing process, check with local building authorities to ensure that your garage door framing complies with local building codes and regulations. Obtain any necessary permits before proceeding with construction.

14. Professional Assistance (if needed): If you’re uncertain about any step or if the framing process seems complex, consider seeking professional assistance from a licensed contractor or structural engineer. They can provide guidance and ensure that the framing meets safety and building code standards.

By following these detailed steps, you can successfully frame for a Garage Door Repair Rockwall TX , creating a sturdy and properly aligned structure to support the door’s installation. Always prioritize safety, follow local building codes, and consult professionals if needed for a successful garage door framing project.

BH Garage Doors and Gates

1-214-206-5231